
Logging with Python
Logging is an essential part of any software development project. It allows developers to monitor and troubleshoot code behavior, track errors, and exceptions, and gain insight into the performance of their applications. The print function is, however, commonly used to log and debug Python code. While printfunction is limited on some outputs on the console, we would like to add some functionality to our logger. Let us examine these additional functionalities:
- every log should inform us about the time it was generated,
- every log must indicate its type (error, warning, general information, etc),
- every log should contain some information about what is doing the log and where to look for its source.
As part of this short article, I will provide you with information on how to create logging in to Python correctly.
In Python, we dispose of the logging module that provides a flexible and powerful logging framework that can be customized to fit the needs of any project. The package is by default installed with the Python installation so that no extra installation and configuration for the loggingpackage is needed.
Here, I will discuss how to make logging into Python.
Setting up
Currently, I am programming in Python. Each project uses logging. For that, I will create a separate project called utils, which will contain all of my common functions including logging. We also create a module for the utils project (folder) and name it utils. Well obviously, do not forget to include the __init__.py to make it a proper module.
In utils folder we create a file named custom_logger.py. This script contains the logging logic. This project aims to implement a logger instance that can be used in all projects that I will create in the future. We will basically replace the print function with one of the logging methods on the logger object, such as debug(), info(), warning(), error(), or critical().
Step 1: Import the logging module
The first step in creating a logging system is to import the logging module into your Python script. This module provides the necessary classes and methods for creating and configuring loggers.
import logging
Therefore, this is the first line of our custom_logger.py file.
Step 2: Create a logger
The logging module provides a Logger class that can be used to create a logger object. This object can be used to log messages at different levels of severity, such as debug, info, warning, error, and critical. The logger can also be configured to log messages to different output streams, such as a file or the console.
logger = logging.getLogger('my_logger')
logger.setLevel(logging.DEBUG)
creates a logger named my_logger and sets its logging level to DEBUG, which means that all messages with a severity level of DEBUG or higher will be logged.
Step 3: Configure the logger
The Logger object can be further configured by adding one or more Handler objects. A Handler specifies where the log messages should be sent, such as a file, the console, or a remote server. The logging module provides several built-in Handler classes, including StreamHandler, FileHandler, and SMTPHandler.
For example to create a StreamHandler and to tell our logger to pipe the logs to the console:
# Create handlers
console_handler = logging.StreamHandler(sys.stdout)
logger.addHandler(console_handler)
Until now nothing special, it is the same as print. Why all of these configurations and extra code? It’s simple. Now, we can add other handlers to our code and also customize our logging outputs.
For example, adding a FileHandler in order to have all the logs in a file would log on both a console and a file.
# Create handlers
file_handler = logging.FileHandler("./logs.log")
logger.addHandler(f_handler)
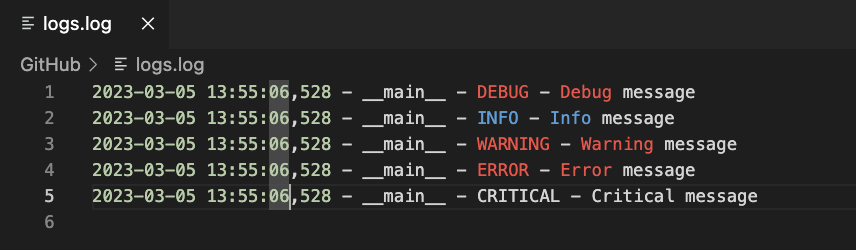
The previous example creates a file logs.log in the current directory of the application and prints all the logs.
Step 4: Adding formatter for the logger
Next, we can do in our log is to add formatting of the messages that appear as logs. This is done by the Formaterobject. Formatters are used to format log messages before they are written to an output destination such as a file, console, or network socket. Formatters specify the structure of the log message and can include information such as the time of the log message, the log level, the logger name, and the actual log message.
Here is an example of a basic formatter in Python’s logging module:
# create a formatter
console_handler = logging.Formatter('%(asctime)s - %(name)s - %(levelname)s - %(message)s')

# add the formatter to the handler
console_handler.setFormatter(formatter)
In the above example, the logging.Formatter() constructor is used to create a formatter object. The formatter object is then applied to a logging handler using the setFormatter() method. In this case, the formatter includes the following placeholders:
%(asctime)s: The time when the log message was created.%(name)s: The name of the logger that the message was created on.%(levelname)s: The log level of the message.%(message)s: The actual log message.
When the logger is used to write a log message, the formatter is applied to the message and the resulting string is written to the output destination.
Using formatters in logging can make it easier to read and analyze log messages, especially when working with large-scale applications that generate a high volume of logs. Formatters can also be customized to include additional information or to change the formatting of log messages to meet specific requirements.
The same is done for the f_handlerobject to format the logs that are gone to our logs.log file.
Examine the full code and Test
Let me share with you my logger.py which would look like this:
import logging
import sys


def get_custom_logger(name=__name__, log_file="./logs.log"):
    # Create a custom logger
    logger = logging.getLogger(name)
    logger.setLevel(logging.DEBUG)

    # Create handlers
    console_handler = logging.StreamHandler(sys.stdout)
    file_handler = logging.FileHandler(log_file)

    # Add formatters to handlers
    formatter = logging.Formatter("%(asctime)s - %(name)s - %(levelname)s - %(message)s")
    console_handler.setFormatter(formatter)
    file_handler.setFormatter(formatter)

    # Add handlers to the logger
    logger.addHandler(console_handler)
    logger.addHandler(file_handler)

    return logger
In the application, we import the get_custom_logger function from a logger module. We then call this function with the __name__ argument to create a custom logger instance. We can then use this logger to log messages at different severity levels using methods like debug, info, warning, error, and critical. The messages will be output to the console and to a log file, with a timestamp, logger name, severity level, and message content.
from utils.log.logger import get_custom_logger

# get logger instance
logger = get_custom_logger(__name__)

# example usage
logger.debug('Debug message')
logger.info('Info message')
logger.warning('Warning message')
logger.error('Error message')
logger.critical('Critical message')
You can take a look at my Github repository to download the code.