Chatbot for booking flights
I will introduce my 10th OpenClassrooms Data Scientist: AI Engineer project here. This project aims to develop an MVP that helps FlyMe staff book plane tickets for vacations. This starter version of the chat must identify the following five elements in the user’s request: Departure city, Destination city, Desired outbound flight date, Desired return date of the flight, and Maximum budget for the total ticket price.
Here you can download the presentation of this project.
What is a chatbot?
A chatbot is simply a computer program that can interact with humans by stimulating conversations. We can find chatbots on many websites as well as in mobile applications. Now, formally speaking a chatbot is a computer program that responds to user input or action. We have seen in the recent past that the user must give some very clear commands or phrases to get an answer to their question. For example, when booking a plane ticket the user needs to write: <by-tiket-plane>. But what if the user did not know the exact command to give the bot? The bot would tell the user that he did not understand the command. However, this changed with the advent of machine learning. We can now build intelligent chatbots that can converse with the user naturally. This uses natural language. So now, if a user says: ‘Hello, I’d like to book a ticket’, ‘Buy me a ticket’ or ‘Can you please find me a ticket’, the bot should be intelligent enough to understand that it needs to book a ticket.
To build an intelligent chatbot that can be used to help users choose a vacation we will use:
- Microsoft Bot Framework integrates that with Azure BotBuilder SDK
- Python 3.9 to enhance the templates
- Language understanding which is LUIS: Microsoft service to help us build machine learning models.
- BotEmulator to test our bot on a local machine.
- Use an existing dataset:
Frames Dataset
Frames Dataset description
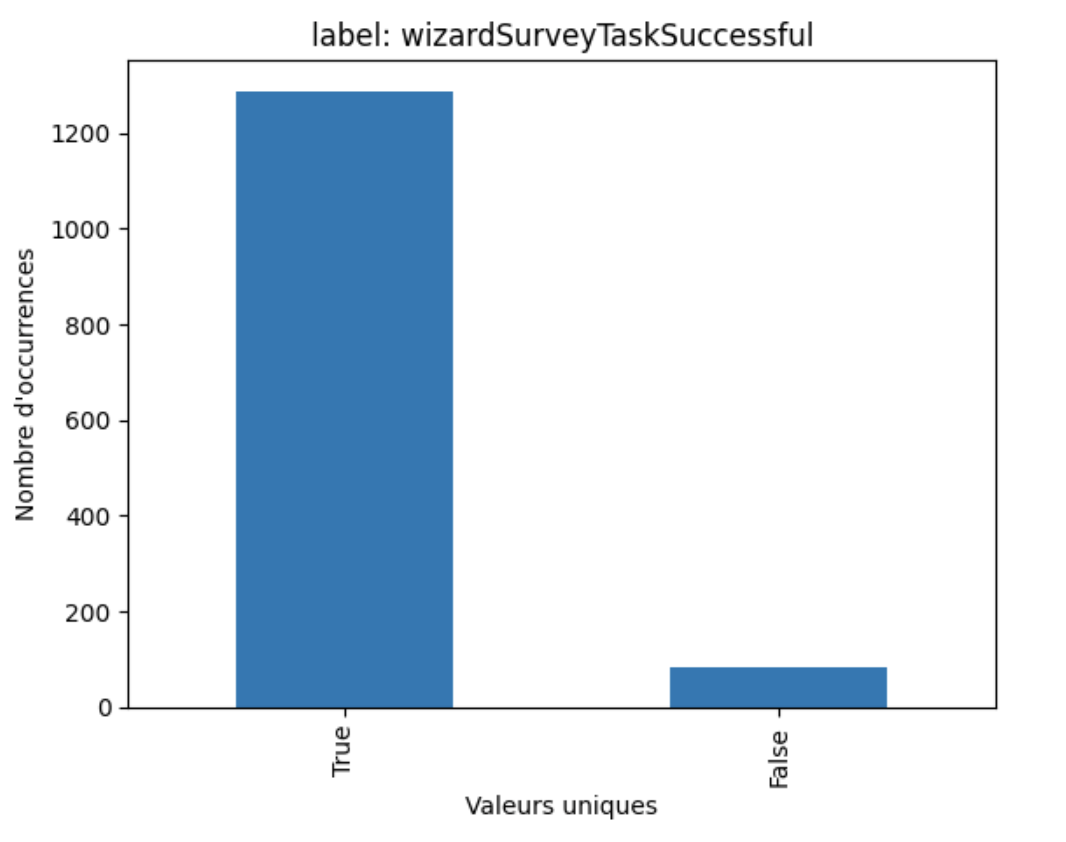
To train LUIS we need data that contains examples of booking flights where we show what the chatbot could expect. We will use the Frames dataset which can be downloaded for free and is described further in this article. As we can see in the following figure the data are composed of 1369 dialogues. Each dialogue is composed of a user utterance and a bot response. The user utterance is the text that the user sends to the bot. The bot response is the text that the bot sends back to the user. 82 comunications users were not satisfied about the bot response. The user satisfaction is indicated by the userSurveyRating field. The True value indicates that the user was satisfied with the bot response. The value False indicates that the user was not satisfied with the bot response.
Frame dialogues are in JSON format. Each dialogue has five main fields: user_id, wizard_id, id, userSurveyRating and turns.
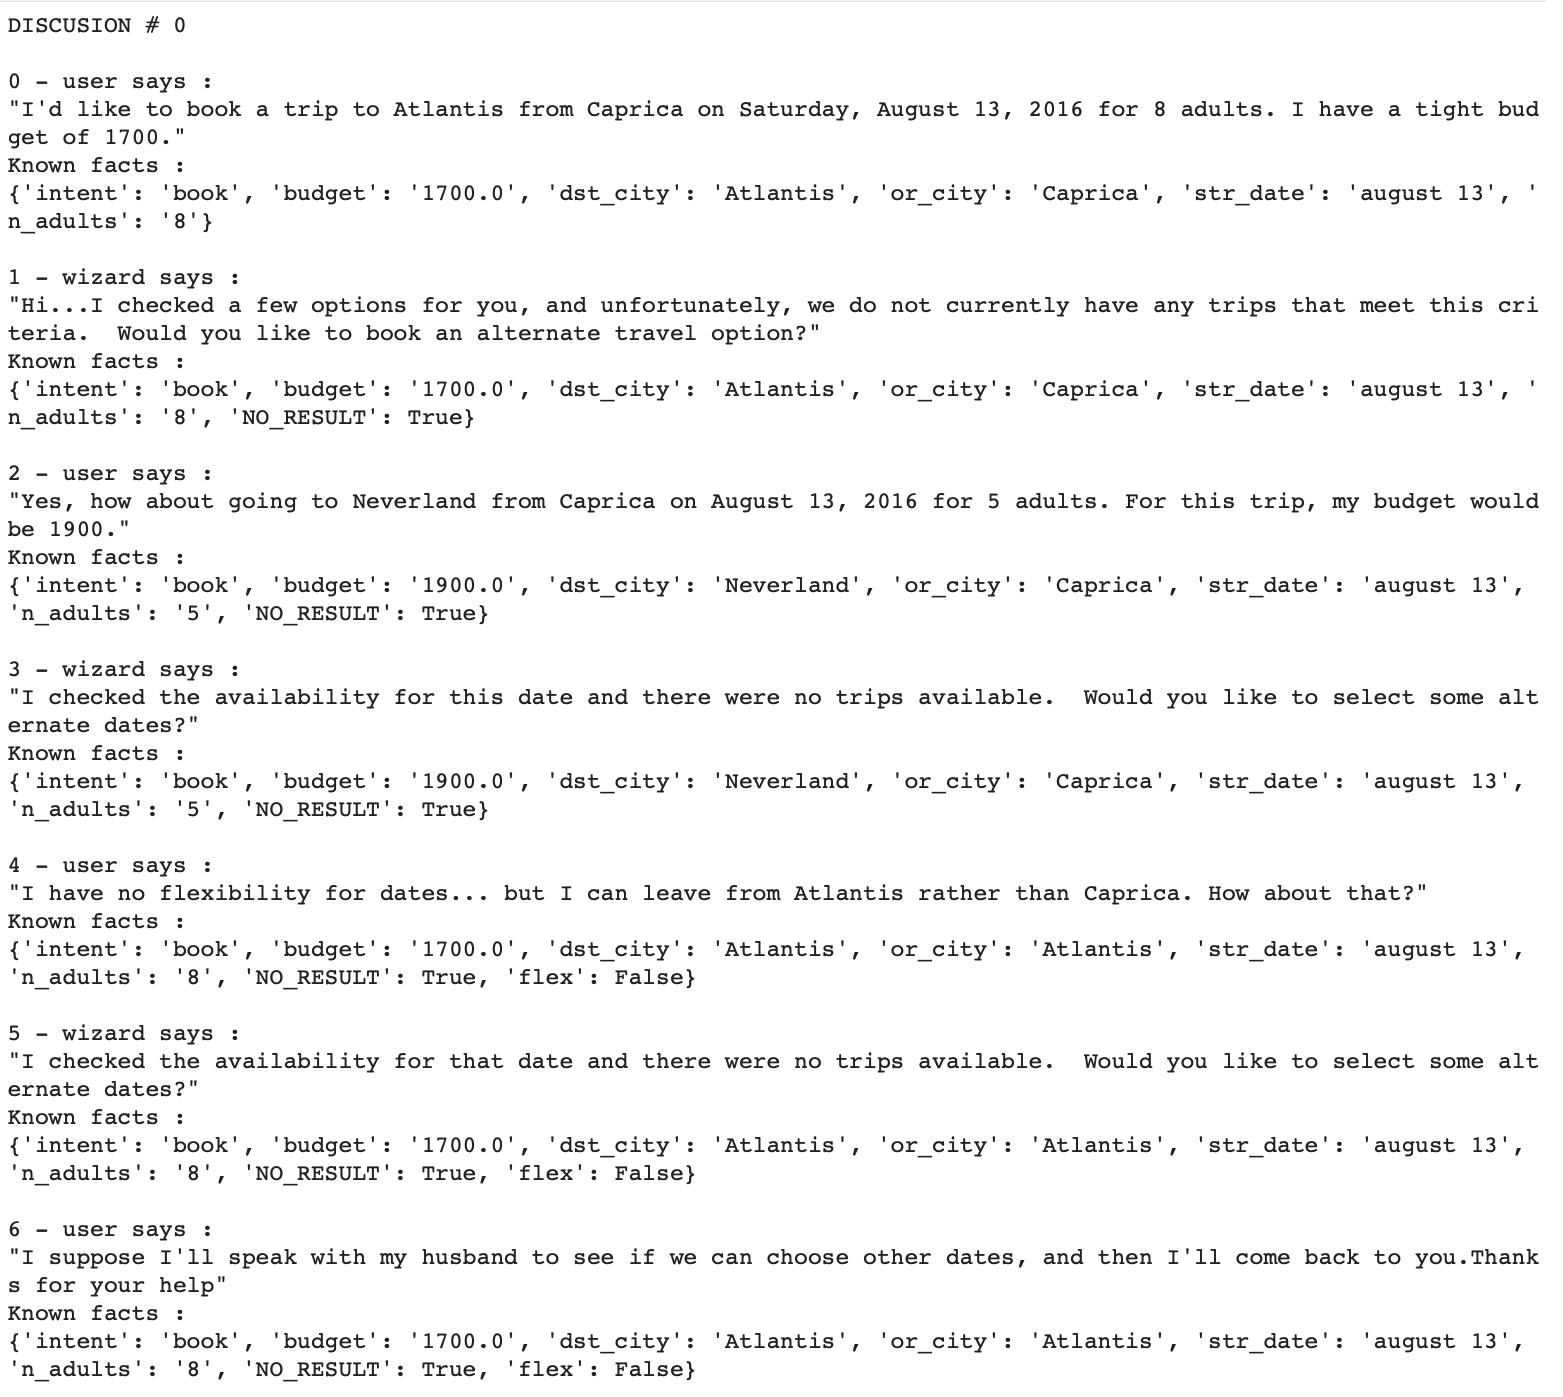
A turn is a dialogue between the user and the bot. Here is an example of a turn between a user and a bot(wizzard) :
LUIS: Language Understanding Cognitive Service
Do you believe it is a person? Not really :) It’s a Microsoft AI service that helps us build machine learning models of text based on natural language user conversations to predict the text’s general meaning and extract the details that are pertinent to the task that we’re exploring.
Let us now explore the LUIS lifecycle, regarding Figure 2, to understand how it works:
- Plan: We need to identify the scenario for which users will use the bot. In our case, we are talking about booking a flight by giving the bot information about that flight.
- Build: Make use of personal resources when developing the application. We will start by defining the intentions and the entities. Next, add utterances for each intention.
- Test and Improve: Testing the application to understand if some improvements are needed.
- Publish: Deploy the application for prediction and interact with the endpoint.
- Connect: Connect to other resources such as MicrosoftBotFramework
- Refine: Review endpoint utterances to enhance your application with real-world examples.

The client library and the API REST Authoring allow us to build, manage, train, test, and publish apps, while the API REST Prediction Runtime allows us to query the published application.
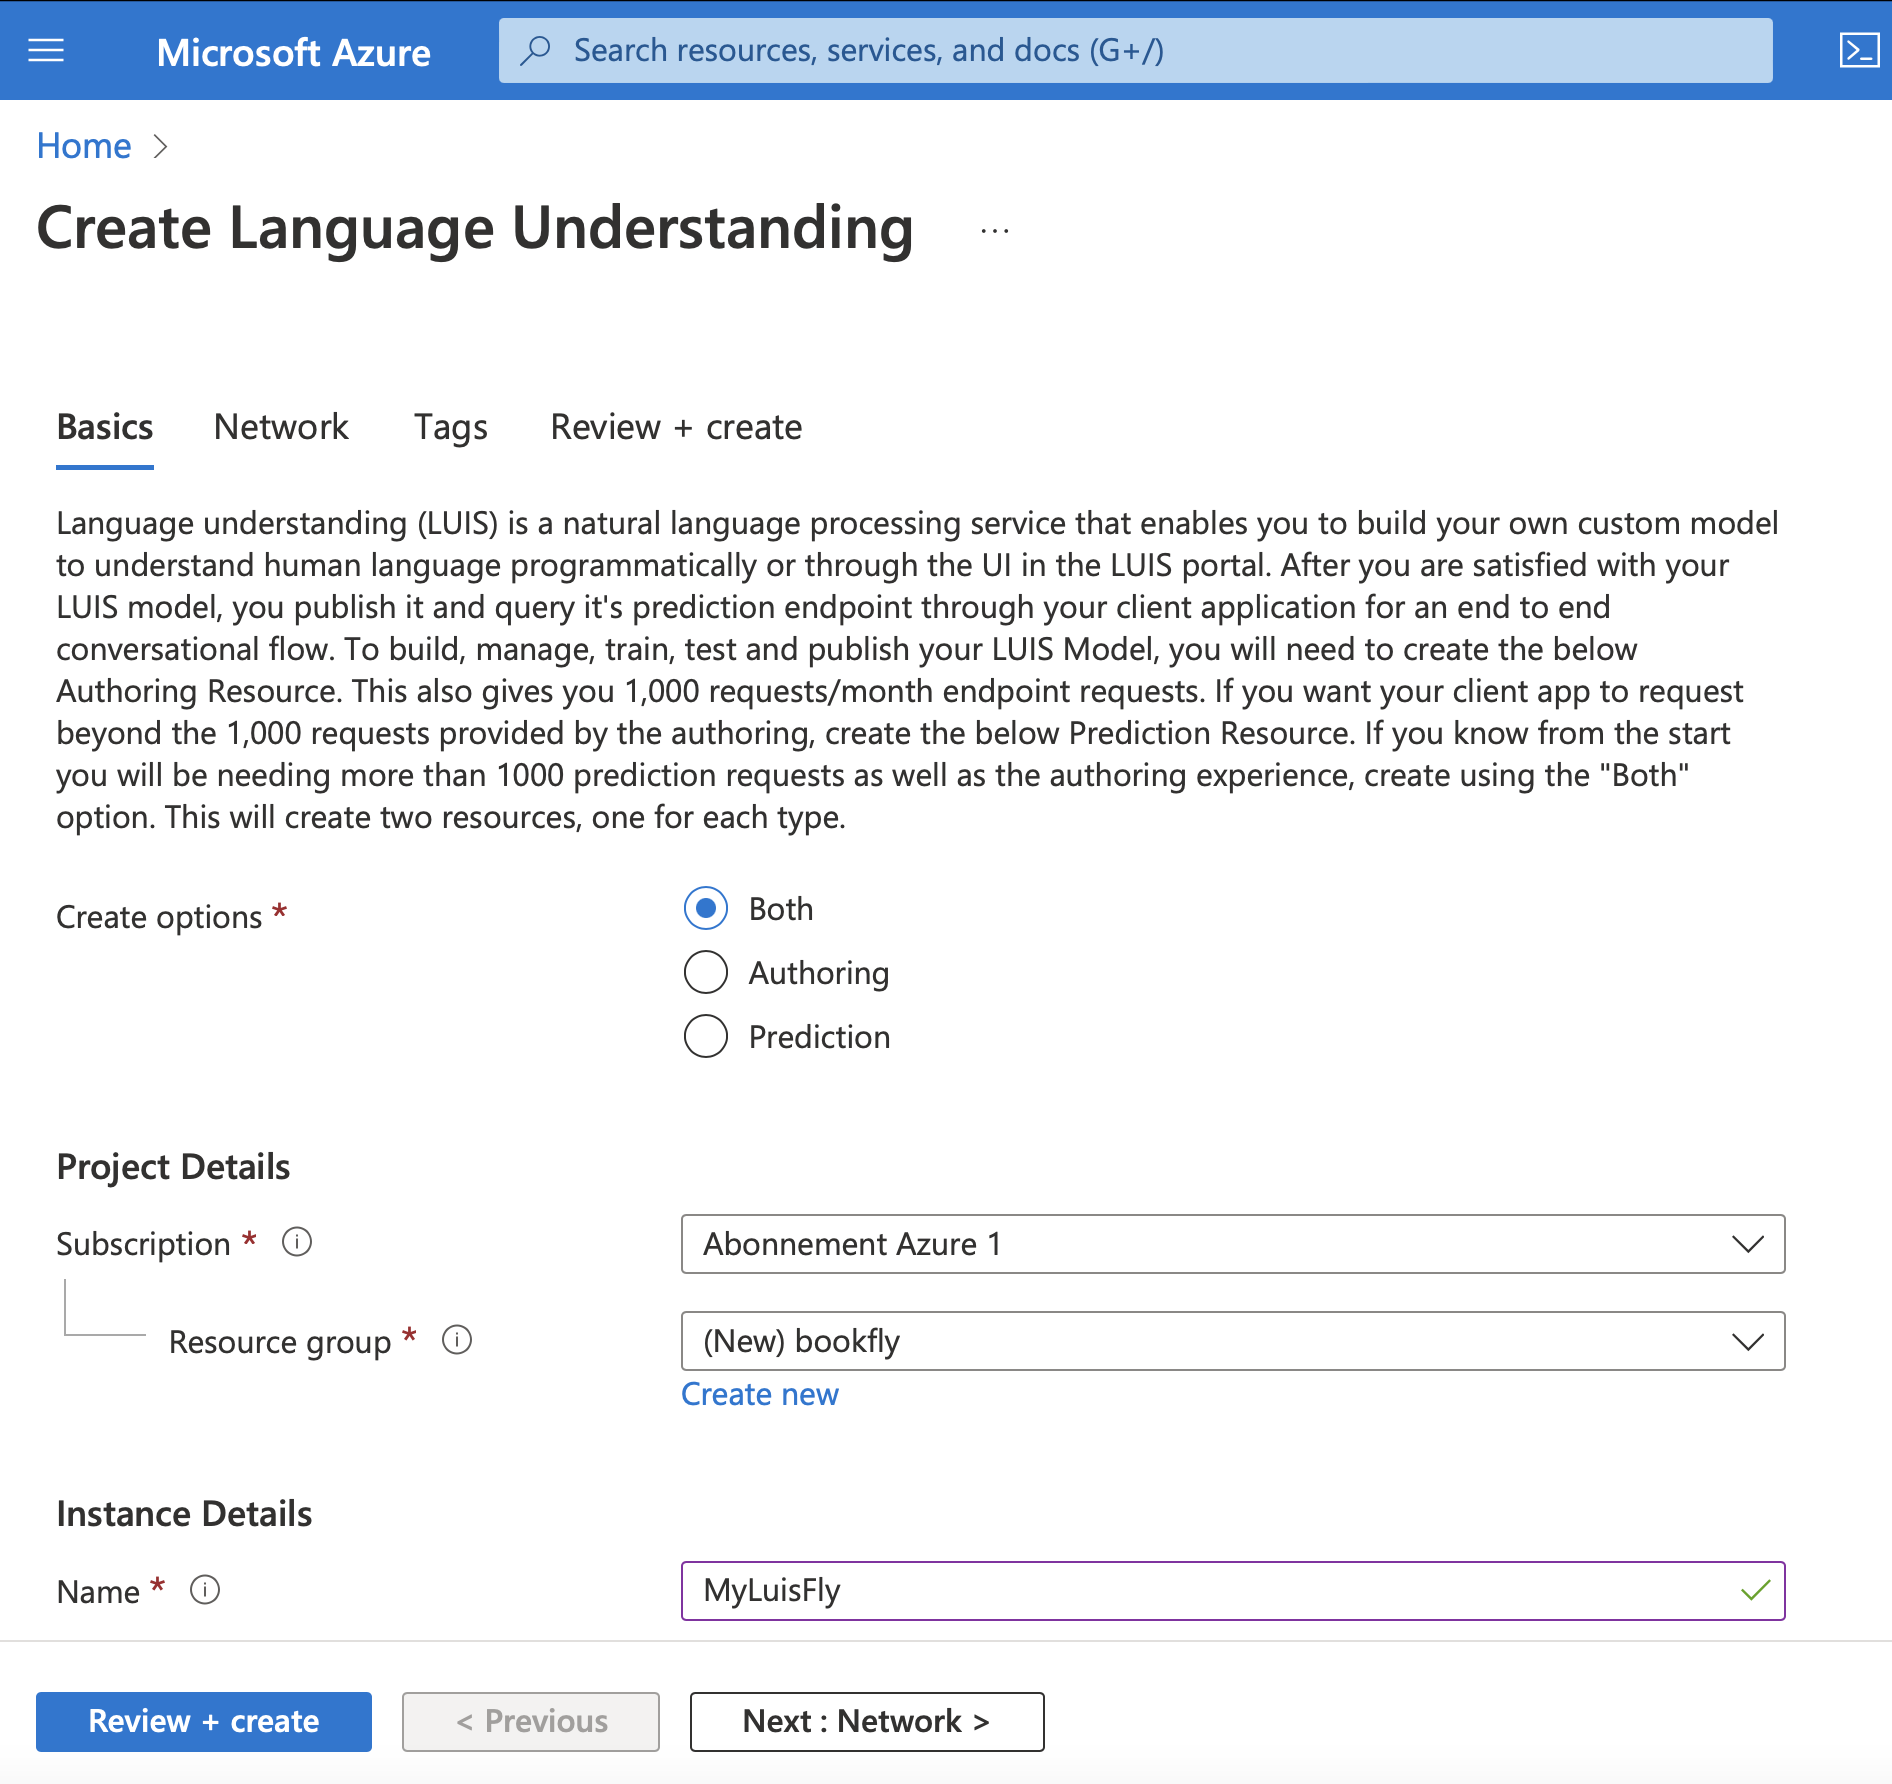
Creating a resource for LUIS creation
To create a language understanding resource we use the following link. We follow the form and click Review + create. Then we click Create. Our resource for LUIS is now created.
Configuration and creation of Python application
I will start working with Jupyter lab to prepare the pipeline. But first, we create the conda environment with python3.9. And then, install the package for the Client with pip:
pip install azure-cognitiveservices-language-luis
The Language Understanding Authoring Client (LUIS) is a LUISAuthoringClient object that authenticates to Azure and contains your creation key. Once we create the client, we can:
- create, delete, and publish the application
- add, delete by id the utterances
- manage phrase lists features
- manage intents and entities in the model
- manage patterns
- train the application and pool for training status
- managing versions by cloning, exporting and deleting
The Language Understanding prediction runtime client (LUIS) is a LUISRuntimeClient object that authenticates to Azure and contains your creation key. Once we create the client, we can:
- prediction by staging or production slot
- prediction by version
Creating the source code in python
Importing libraries
First, we shall import the following libraries:
from azure.cognitiveservices.language.luis.authoring import LUISAuthoringClient
from azure.cognitiveservices.language.luis.authoring.models import ApplicationCreateObject
from azure.cognitiveservices.language.luis.runtime import LUISRuntimeClient
from msrest.authentication import CognitiveServicesCredentials
from functools import reduce

import json, time, uuid
Configuration
Next, we create variables to hold the authoring key and resource names. You can find the values in the Azure Portal where the resources were created.
authoringKey = '*****'
authoringEndpoint = 'https://*****.cognitiveservices.azure.com/'
predictionKey = '*****'
predictionEndpoint = 'https://*****.cognitiveservices.azure.com/'
Also, we create variables to hold your endpoints, app name, and version.
appName = "bookfly " + str(uuid.uuid4())
versionId = "0.1"
We use python-dotenvpackage and hold these variables on .env file in order not to make them public. Consider reading my blog with working with .env files to create environment variables.
Create Luis Authoring client
And we create the Luis Authoring client:
client = LUISAuthoringClient(authoringEndpoint, CognitiveServicesCredentials(authoringKey))
Creating application
As we previously discussed, we can create the application using the clientobject.
appDefinition = ApplicationCreateObject (name=appName, initial_version_id=versionId, culture='en-us')
# create app
app_id = client.apps.add(appDefinition)
Creating utterances
Creating intent for the app
The first thing to take into consideration in the LUIS app’s model is the intent. The intent aligns with a grouping of user utterance intentions. Examples of intentions are: ‘Booking a flight’, ‘weather in the destination place’, ‘Price of ticket’, etc. We use:
intentName = "BookFlyght"
client.model.add_intent(app_id, versionId, intentName)
to add intent to the model.
Creating an entity for the app
The entity is not required, however, we can find them in most apps. The entity will take the information from the user’s utterance, necessary to fulfill the user’s information. There are several types of prebuild and custom entities each with its data transformation object models. Some prebuild entites are: number, datetimeV2, geographyV2, ordinal. Prebuild entities are added as follows to the application:
prebuilt_entity_id = client.model.add_prebuilt(
                app_id=app_id,
                version_id=app_version,
                prebuilt_extractor_names=[entity],
            )
For the booking application, we shall add
prebuilt_entities = ['geographyV2', 'datetimeV2', 'number']
You should see something like this as output:
Prebuilt entity geographyV2 added with ID [<azure.cognitiveservices.language.luis.authoring.models._models_py3.PrebuiltEntityExtractor object at 0x2c32002b0>] to app e22901cf-913d-42ed-a02c-d6cf27334de2
Prebuilt entity datetimeV2 added with ID [<azure.cognitiveservices.language.luis.authoring.models._models_py3.PrebuiltEntityExtractor object at 0x2c3238400>] to app e22901cf-913d-42ed-a02c-d6cf27334de2
Prebuilt entity number added with ID [<azure.cognitiveservices.language.luis.authoring.models._models_py3.PrebuiltEntityExtractor object at 0x2c32388e0>] to app e22901cf-913d-42ed-a02c-d6cf27334de2
Now, let’s look at the custom entities:
entity_id = client.model.add_entity(
            app_id, app_version, name=entity_name, description=entity_description
        )
Also, for each entity, we add features
feature_id = self.client.features.add_entity_feature(
            app_id=self.app_id,
            version_id=self.app_version,
            entity_id=entity_id,
            feature_relation_create_object={
                "model_name": feature_model_name,
            },
        )
where the feature_model_name is assigned according to
{'or_city': 'geographyV2',
'dst_city': 'geographyV2',
'str_date': 'datetimeV2',
'end_date': 'datetimeV2',
'budget': 'number'}
Here is an example of an utterance that I created:
{'text': "I'd like to book a trip to Atlantis from Caprica on Saturday, August 13, 2016 for 8 adults. I have a tight budget of 1700.",
 'intent_name': 'BookFlight',
 'entity_labels': [{'entity_name': 'dst_city',
   'start_char_index': 27,
   'end_char_index': 35},
  {'entity_name': 'or_city', 'start_char_index': 41, 'end_char_index': 48},
  {'entity_name': 'str_date', 'start_char_index': 52, 'end_char_index': 77},
  {'entity_name': 'budget', 'start_char_index': 117, 'end_char_index': 121}]}
and to get the entity from it
true_entity = {entity['entity_name']: utt['text'][entity['start_char_index']:entity['end_char_index']]
                for entity in utt['entity_labels']}
true_entity
gives me
{'dst_city': 'Atlantis',
 'or_city': 'Caprica',
 'str_date': 'Saturday, August 13, 2016',
 'budget': '1700'}
Training
Before training the utterances we split the obtained dataset:
from sklearn.model_selection import train_test_split
train_data, test_data = train_test_split(extractor.utterances, test_size=0.2, shuffle=True, random_state=3)
We obtain 3500 train_data and 876 test data. Finally, use train_data to train the LUIS application.
client.train.train_version(app_id, app_version)
waiting = True

while waiting:
	info = client.train.get_status(app_id, app_version)
   # get_status returns a list of training statuses, one for each model. Loop through them and make sure all are done.
   waiting = any(map(lambda x: 'Queued' == x.details.status or 'InProgress' == x.details.status, info))
   if waiting:
   		print ("Waiting 10 seconds for training to complete...")
       time.sleep(10)
   else:
   		print("The app is trained !")
       waiting = False
Publishing
And publish the application with:
client.apps.update_settings(app_id, is_public=True)
publish_result = client.apps.publish(app_id, app_version, is_staging=False)
Testing
Look for the following code of testing:
def get_clientRuntime():
	runtimeCredentials = CognitiveServicesCredentials(_prediction_key)
   clientRuntime = LUISRuntimeClient(endpoint=_prediction_endpoint, credentials=runtimeCredentials)
   return clientRuntime

def test(query: str):
	clientRuntime = get_clientRuntime()
   request = { "query" : query }
   predictionResponse = clientRuntime.prediction.get_slot_prediction(app_id=app_id, slot_name="Production", prediction_request=request)

   print("Top intent: {}".format(predictionResponse.prediction.top_intent))
   print("Intents: ")

   for intent in predictionResponse.prediction.intents:
   		print("\t{}".format (json.dumps(intent)))
       print("Entities: {}".format (predictionResponse.prediction.entities))
Now, let’s test the application here. By giving a text we should predict the intents and the entities. As our intents are BookFlight for every created utterance, let us look to the predicted entities.
$ test('I would like to book a flight from Lyon to Paris tomorrow at 11pm with a budget of 100 euros')

Top intent: BookFlight
Intents:
	"BookFlight"
Entities: {'or_city': ['Lyon'], 'dst_city': ['Paris'], 'geographyV2': [{'value': 'Paris', 'type': 'city'}], 'datetimeV2': [{'type': 'datetime', 'values': [{'timex': '2023-02-24T23', 'resolution': [{'value': '2023-02-24 23:00:00'}]}]}], 'number': [100], 'budget': ['100 euros']}
We can see that the LUIS model that we trained found the entities as expected.
Model Evaluation
It is necessary to evaluate the model in order to understand its performance. The LUIS model must be evaluated both in terms of its accuracy and performance as it pertains to understanding user intents and extracting relevant information from the input of the user.
The test dataset is used to evaluate the model. A comparison is made between the predicted and actual entities. If the predicted entity matches the real one, a value of 1 is added to the true value. If part of the predicted entity is contained in the true entity, the correct value is increased by 0.5. Our accuracy score is calculated as follows:
(correct_entity / len(true_entities)) * 100
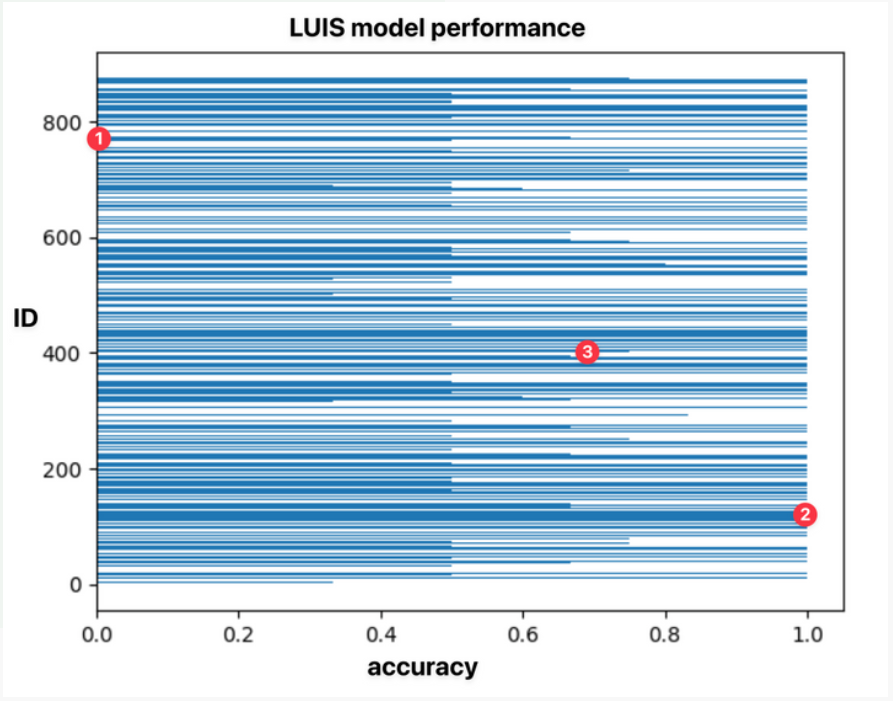
Based on the test data, we obtained a precision of 59.71% between the predicted model and the actual liberalization of the original data. Figure 4 shows each utterance was evaluated. Several utterances were evaluated with 100% precision. Many of them predict nothing, while others have middle precision levels. We can examine these three types of utterances by observing them.
First, let us examine the case where entities can be predicted with 100% accuracy. Here, our test data looks like this:
{'text': 'Can anything help resurrect my career at this point??? Is there any sadder rung in society than that of the failed writer\nOk you know what, maybe you can help\nGet me to Campinas to San Juan please\nMe, my wife, and my son',
 'intent_name': 'BookFlight',
 'entity_labels': [{'entity_name': 'or_city',
   'start_char_index': 169,
   'end_char_index': 177},
  {'entity_name': 'dst_city', 'start_char_index': 181, 'end_char_index': 189}]}
The true entities are:
{'or_city': 'Campinas', 'dst_city': 'San Juan'}
while the predicted entities are:
{'or_city': 'Campinas',
 'geographyV2': {'value': 'Campinas', 'type': 'city'},
 'dst_city': 'San Juan'}
We see that the or_city and dst_city are predicted by the LUIS model as expected.
Let us now examine the case where we have 66.66% accuracy.
{'text': 'Can I take my wife and son from Madrid to Santos for 4800??',
 'intent_name': 'BookFlight',
 'entity_labels': [{'entity_name': 'or_city',
   'start_char_index': 32,
   'end_char_index': 38},
  {'entity_name': 'dst_city', 'start_char_index': 42, 'end_char_index': 48},
  {'entity_name': 'budget', 'start_char_index': 53, 'end_char_index': 57}]}
The true entities are:
{'or_city': 'Madrid', 'dst_city': 'Santos', 'budget': '4800'}
We obtain the predicted entities:
{'or_city': 'Madrid',
 'dst_city': 'Santos',
 'geographyV2': {'value': 'Santos', 'type': 'city'},
 'number': 4800,
 'budget': '4800??'}
The budget entity is the source of this problem. Observe that the predicted entity took into consideration the questions at the end of the number. This is because there were no spaces here, and cleaning the dataset could resolve this issue. However, for this project, I do not consider this.
Finally, what happens to the utterances that are examined with 0% accuracy? The same as for the 66% accuracy case. We find entities that contain some characters at the end, which explains that the predicted entity takes 0% of accuracy.
Bot Builder
In this part we create our bot using the Bot Framework SDK with python. We will focus on (21.corebot-app-insights)[https://github.com/microsoft/BotBuilder-Samples/tree/main/samples/python/21.corebot-app-insights] to create our bot for booking flights. This is because this is a perfect example for us because:
- this bot was created with Bot Framework,
- it uses LUIS to implement core AI capabilities
- it implements multi turn conversation using Dialogs
- it will handle user interruptions for such things as
Cancel` - promt for and validate requests for information from the user
- finally it uses the application insights that was created in the previous section
The steps for installing the bot are very simple. First, just clone the repository:
git clone https://github.com/Microsoft/botbuilder-samples.git
Next, activate the environment you are using and install the requirements with:
pip install -r requirements.txt
Finally, run the bot with
python app.py
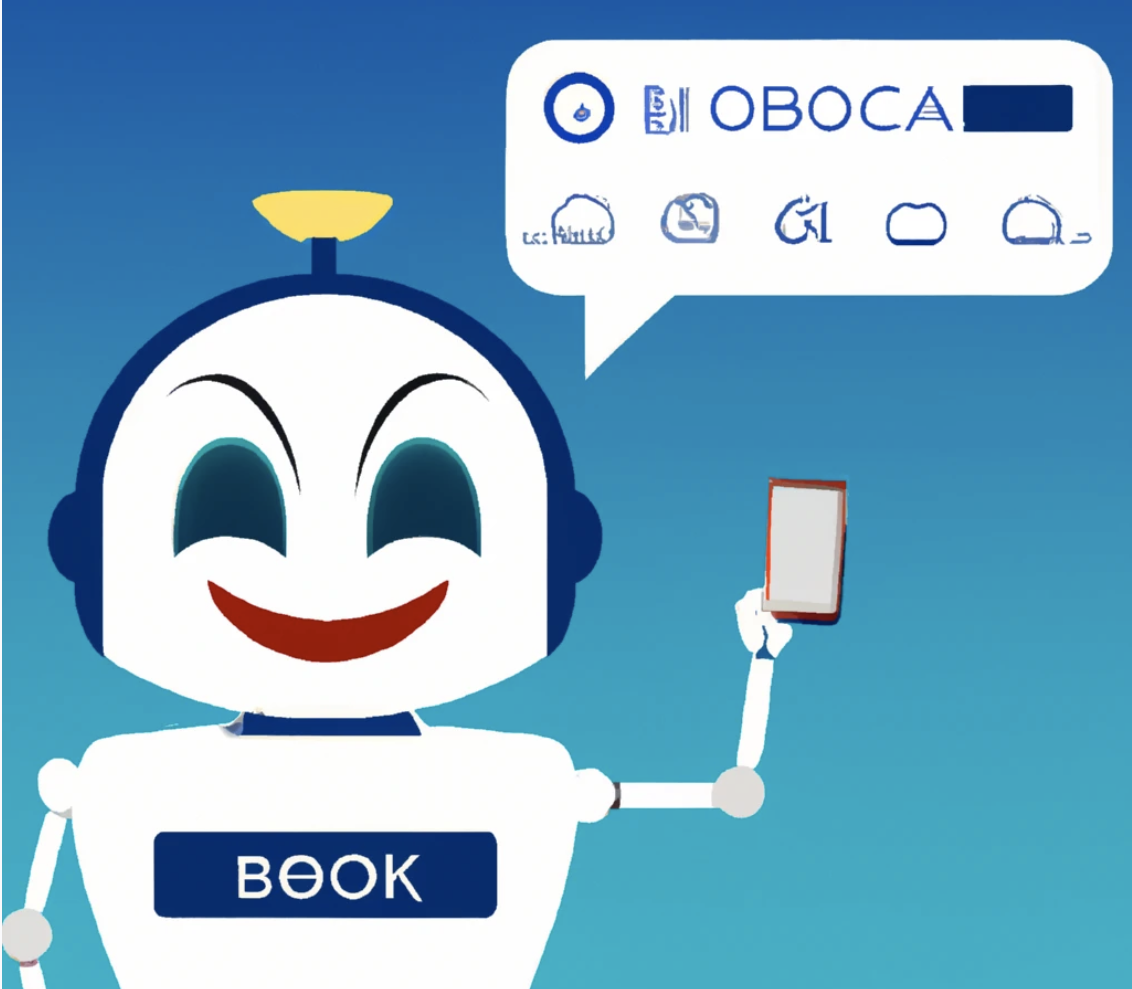
You can now test the bot with the Bot Emulator using the Bot URL of http://localhost:3978/api/messages. We can see an example of such a bot booking flight in Figure 5.
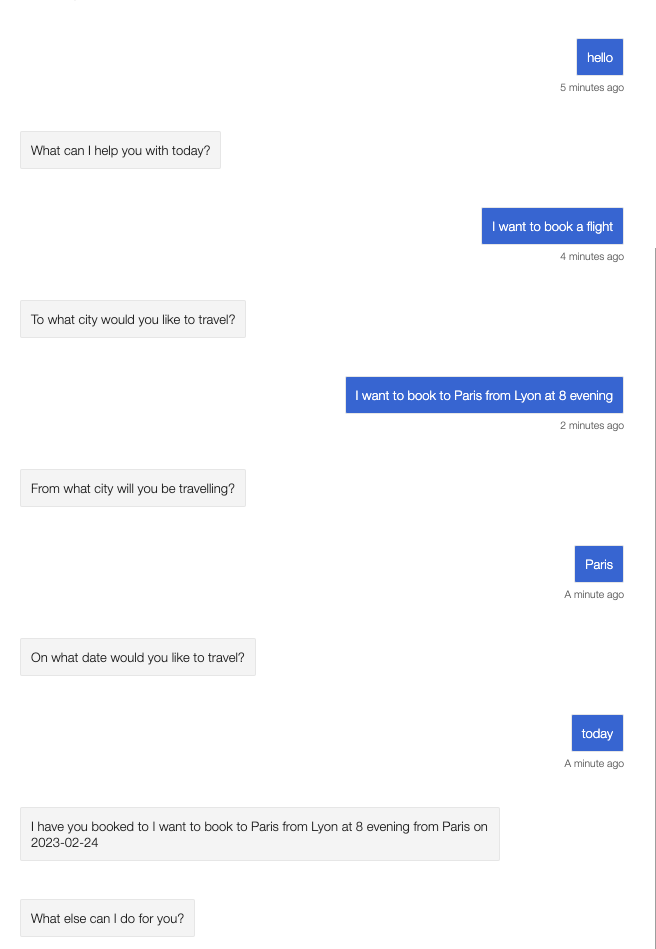
This is the basic bot that we will use for our project. We will now modify it to make it work with our LUIS model and extract the entities from the user’s request. We will also add the application insights to monitor the performance of the bot.
First of all we add the entities that we need in BookingDetails class.
class BookingDetails:
    def __init__(
        self,
        destination: str = None,
        origin: str = None,
        start_date: str = None,
        end_date: str = None,
        budget: int = None,
    ):
        self.destination = destination
        self.origin = origin
        self.start_date = start_date
        self.end_date = end_date
        self.budget = budget
We adapt our code to the BookingDialog class. We add steps like the start and end date. Here is an example of the start date step:
async def start_date_step(
        self, step_context: WaterfallStepContext
    ) -> DialogTurnResult:
        """Prompt for start date."""
        booking_details = step_context.options

        # Capture the results of the previous step
        booking_details.destination = step_context.result

        if booking_details.start_date is None or self.is_ambiguous(booking_details.start_date):
            return await step_context.begin_dialog(
                DateResolverDialog.START_DATE_DIALOG_ID, booking_details.start_date
            )

        return await step_context.next(booking_details.start_date)
We modify the LUIS recognizer to extract entities from the user’s request. We add the entities to the BookingDetails class.
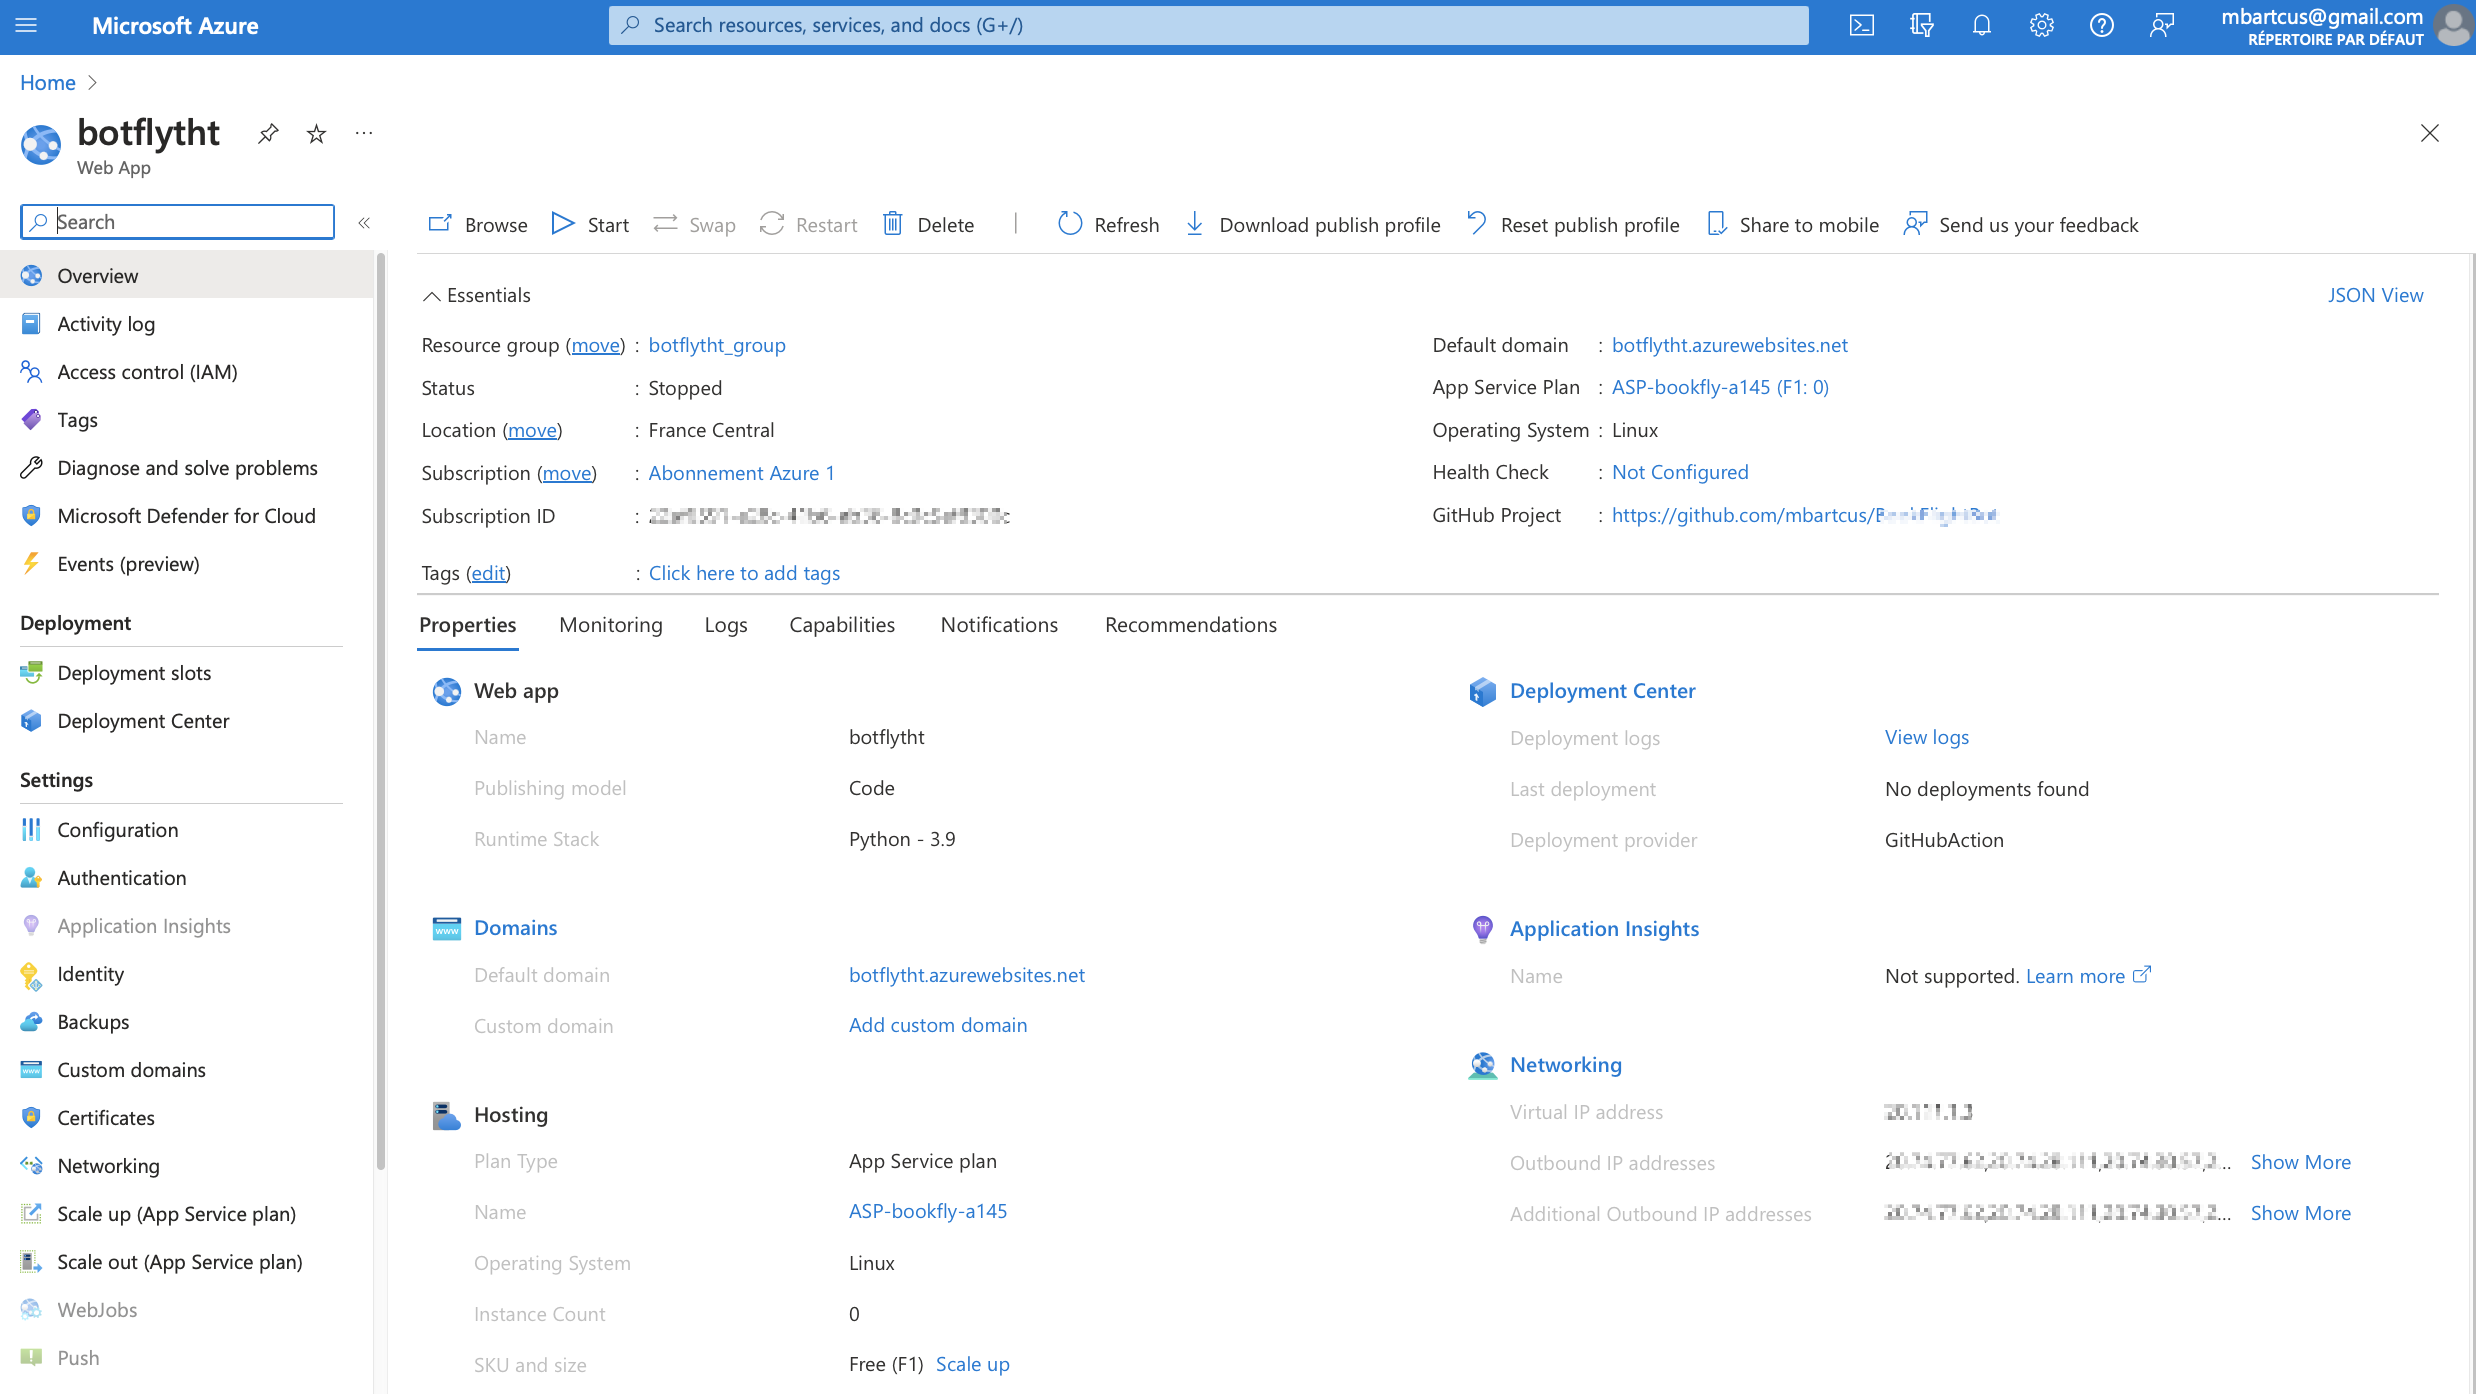
Deploing the bot in Azure
On my local machine, everything works as expected. Now we need it deployed on the server so that everyone in the company can use it to book their flights. We use Azure for this and create the Azure Web App. Here is an example of the Azure Web App that I created.
We need to do some configurations in order the bot to work on the server. First we need to go to the Configuration tab, General Settings -> Startup command and set it to python -m aiohttp.web -H 0.0.0.0 -P 8000 app:main.
Next, we want to use GitHub Actions to deploy our bot in Azure Web App. Also, we want to do it in a automatic way at each push. Therefore we go to Overview of the Azure Web App and download the publish profile. Then we go to the GitHub repository BookFlightBotthat we created for this project and go to the Settings tab. Then we go to Secrets and add the publish profile that we downloaded from Azure to Repository secrets. We name it for exemple AZURE_WEBAPP_PUBLISH_PROFILE. Then we modify the workflow file .github/workflows/main_bookflightbot.yml to add the following lines:
      - name: 'Deploy to Azure Web App'
        uses: azure/webapps-deploy@v2
        id: deploy-to-webapp
        with:
          app-name: 'botflytht'
          slot-name: 'Production'
          publish-profile: $
We can now push our code to GitHub and see the bot deployed in Azure. To see that everything works as expected, we can go and open a browser and type the URL of the bot. This will give us an error 500. This means that the bot is deployed. We need a graphical interface to test it. We can use the Bot Framework Emulator. If not so and other error is displayed, that means that the bot is not deployed. We shoud look to the LogStream to see what is the problem.

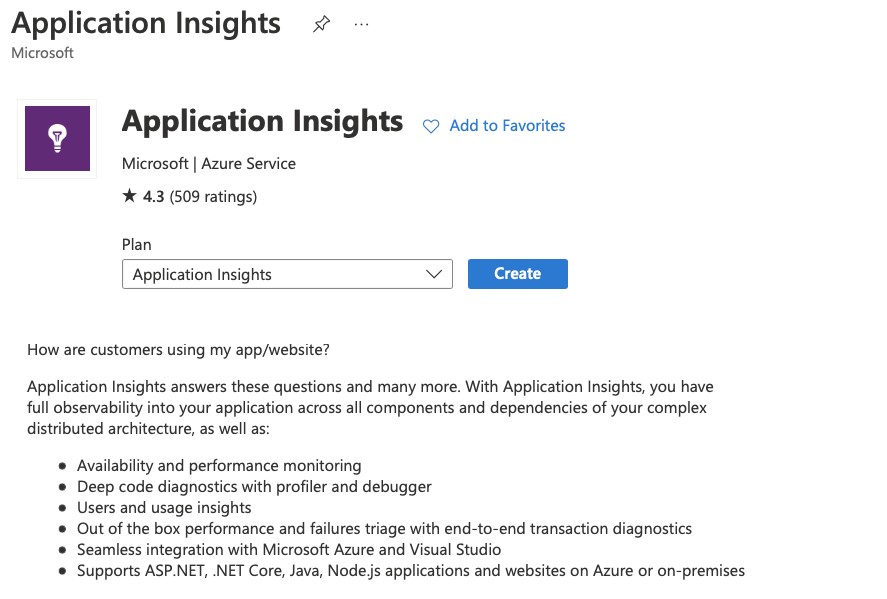
Application Insights
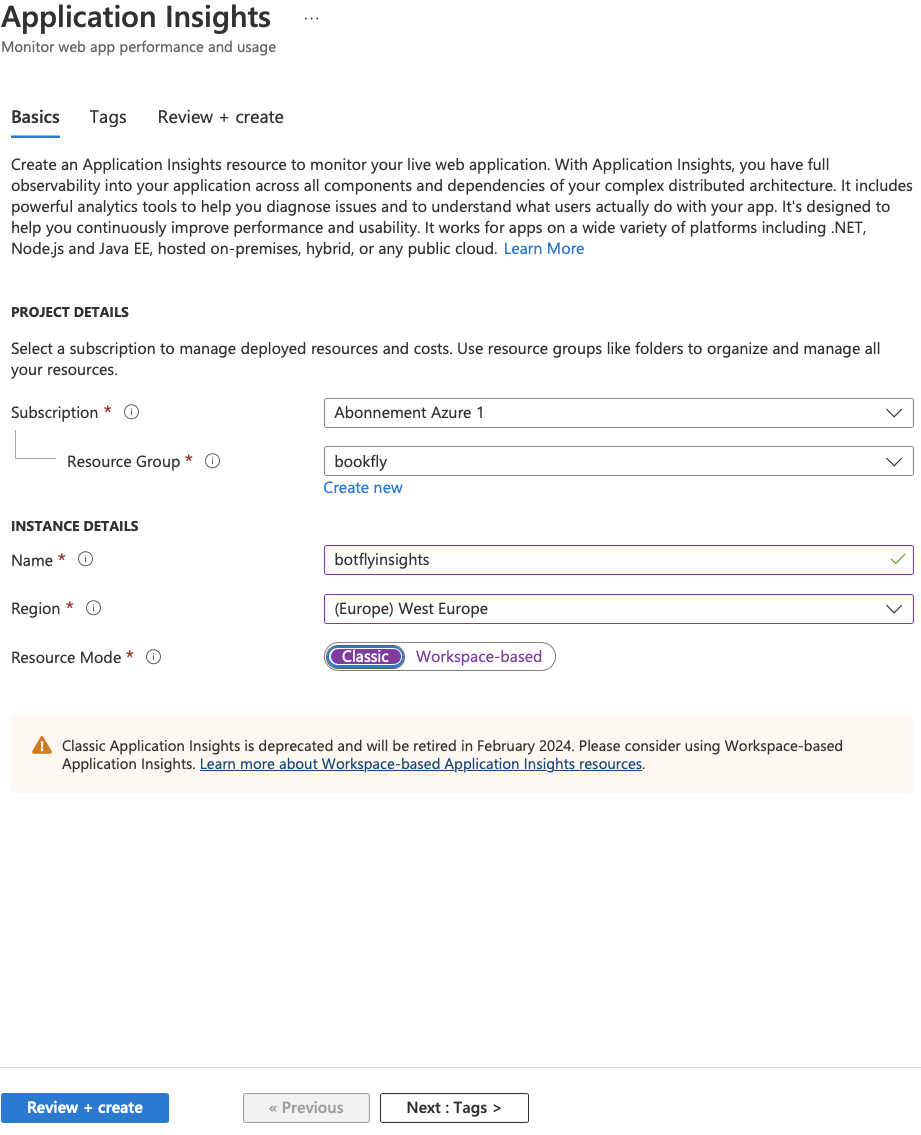
We use Application Insights to control the model’s performance in production. This will permit us to answer the question of “how many customers used the application. It will give us availability and performance monitoring. Go to the Azure portal and create the application Insights as in the figure bellow.
Check the resource mode Classic and click on Renew + create as in Figure 5. Then check the summary and click Create.
Once we created our Application Insights resources, we can use the instrumentation key to configure our application insights sdk. We can copy it to the environment variables (.env file) to use it in our bot that will be created.
We add application insights to monitor the bot’s performance and monitor the problematic interactions (experiences) between the chatbot and the user. Therefore, we use the final step to log in the application insights with AzureLogHandler. Furthermore, we track two details about a user’s experience. The first thing to check is if the flight was satisfied with the bot’s proposals and booked. And the second is if the customer was not satisfied with the bot’s proposals. If the flight was booked, we log it with the level INFO. A customer who is not satisfied is logged with the level ERROR.
async def final_step(self, step_context: WaterfallStepContext) -> DialogTurnResult:
        """Complete the interaction and end the dialog."""
        booking_details = step_context.options

        if step_context.result:
            self.logger.setLevel(logging.INFO)
            self.logger.info('The flight is booked and the customer is satisfied.')

            return await step_context.end_dialog(booking_details)

        prop = {'custom_dimensions': booking_details.__dict__}

        self.logger.setLevel(logging.ERROR)
        self.logger.error('The customer was not satisfied about the bots proposals', extra=prop)


        return await step_context.end_dialog()
In addition, we trigger an alert if the user does not accept the bot’s proposal three times within five minutes. The alert is created under Application Insights, Alerts. We click Create followed by Create rule, and set up our alert. Here is an example of an alert I create.
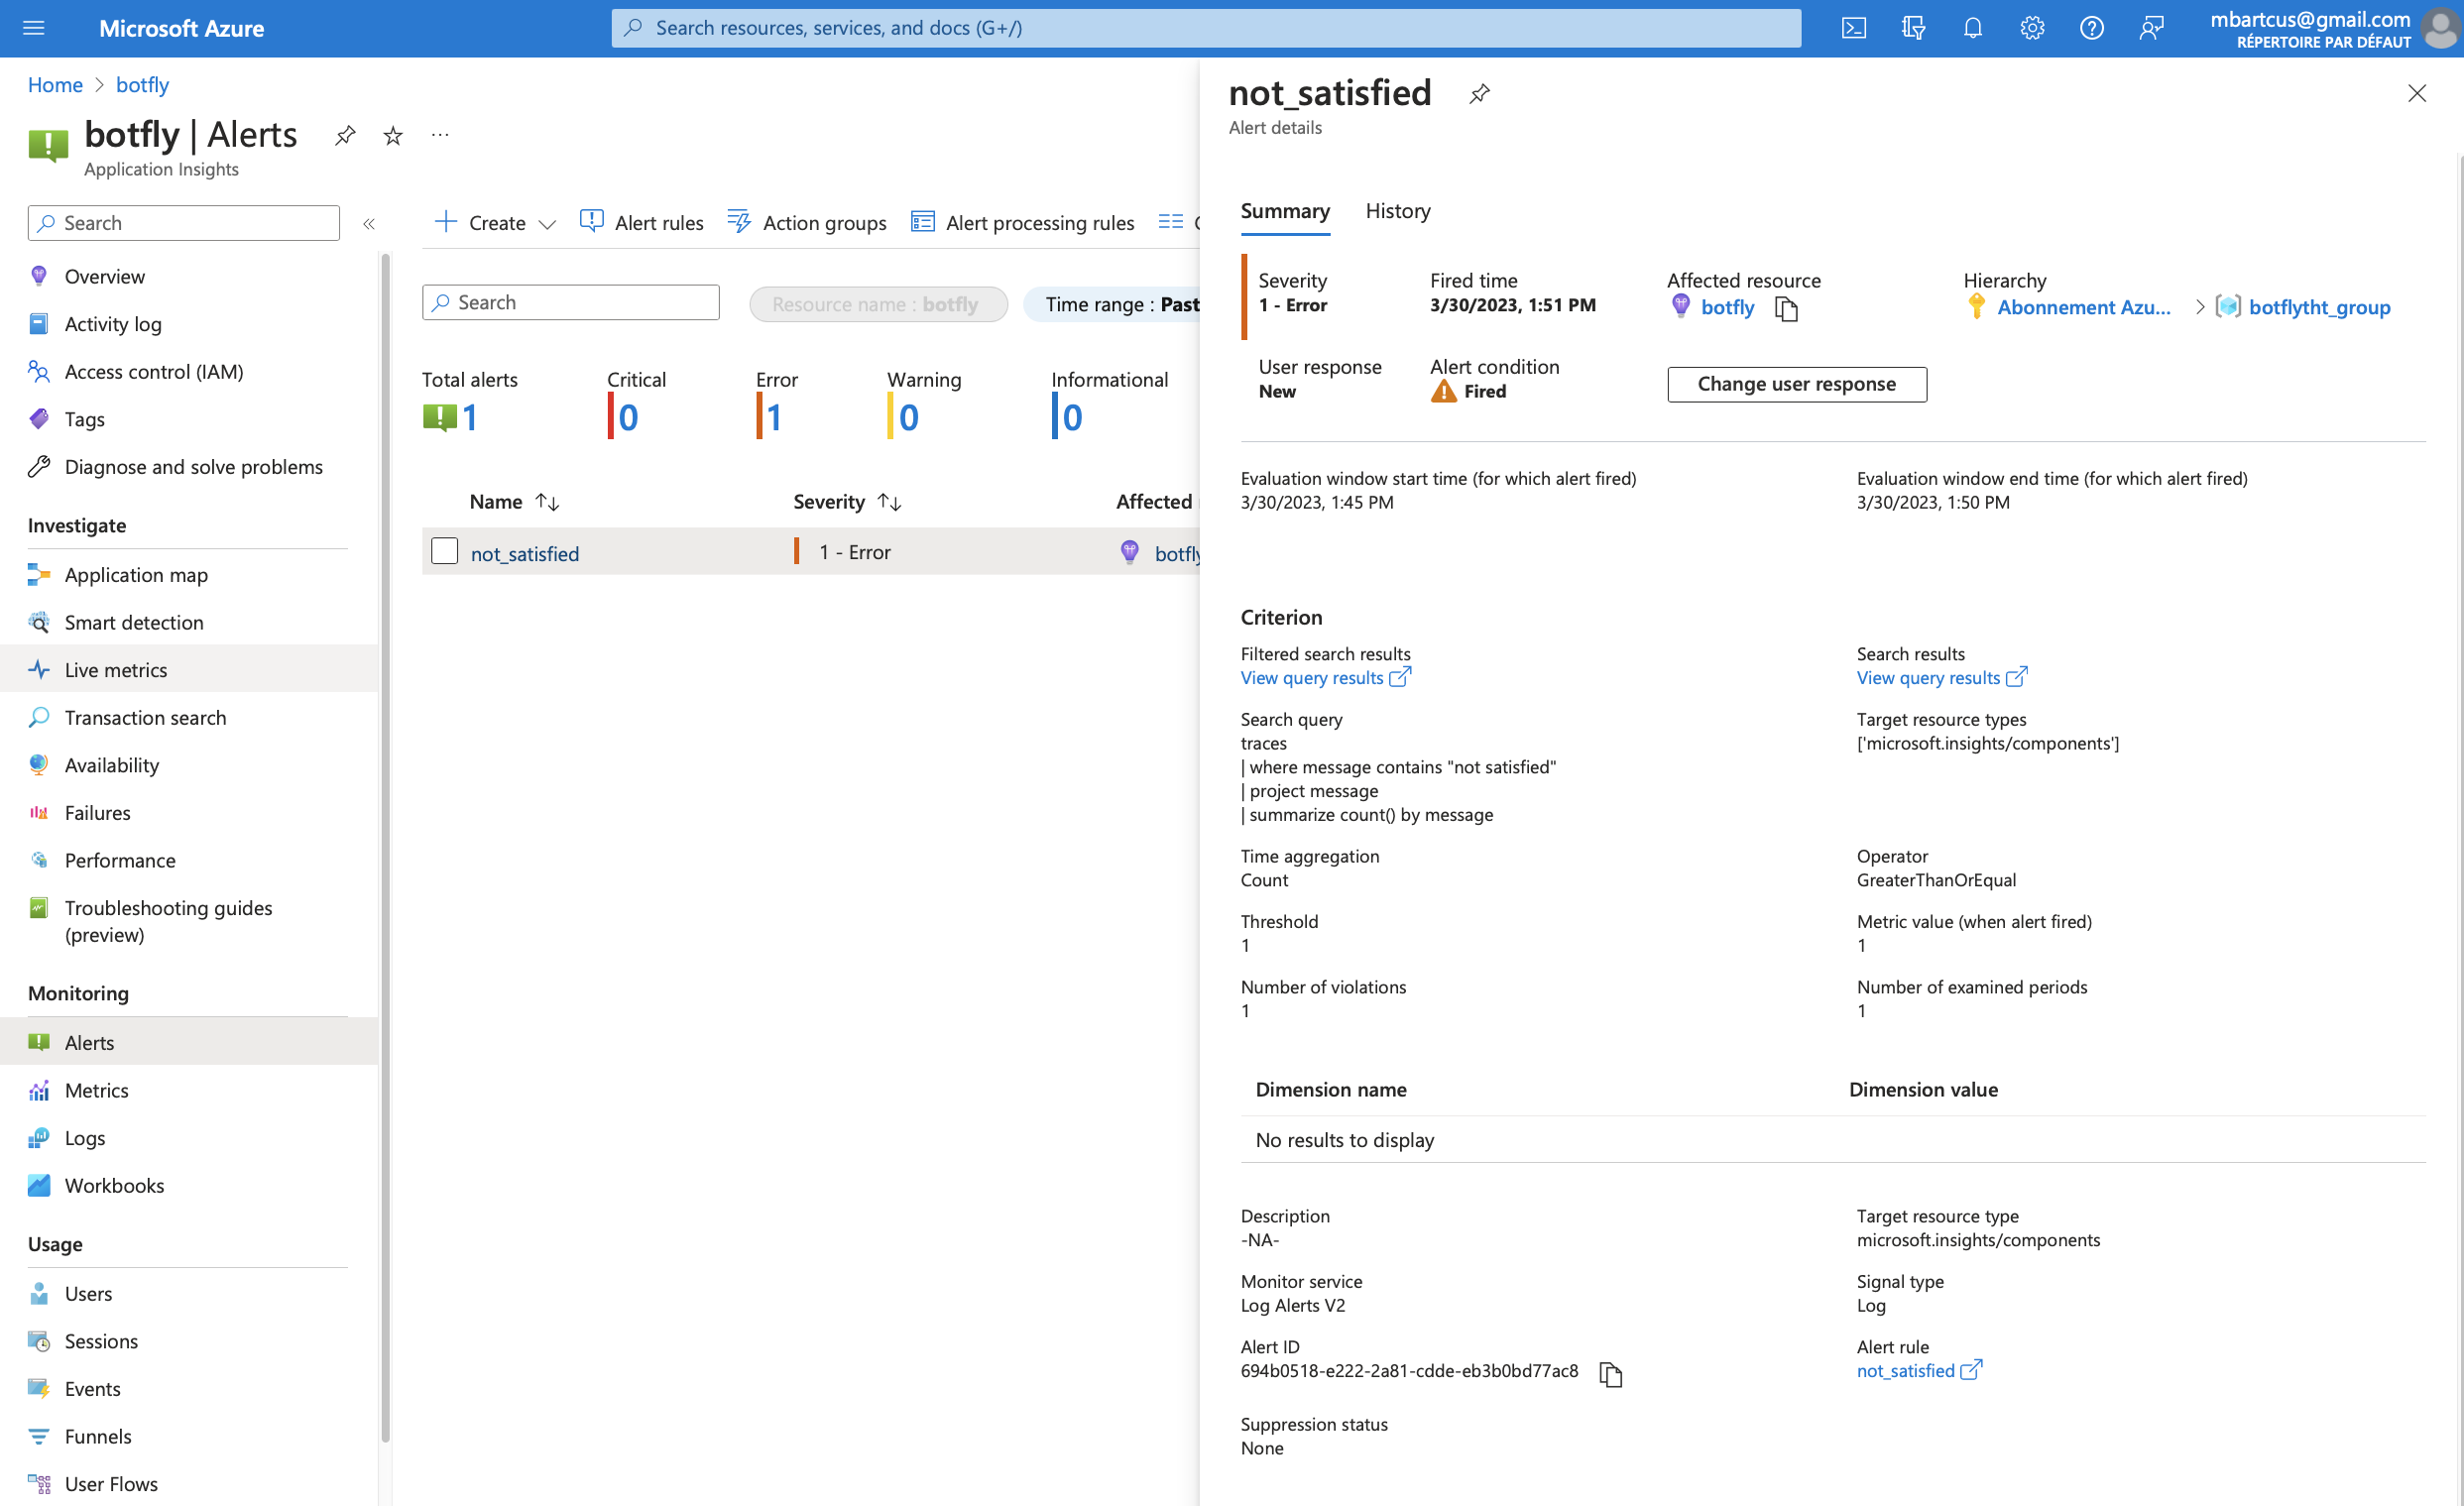
As can be seen, the ERROR level log was triggered three times in five minutes. Therefore in the Error section, the alert was created. It is also possible to view the query that initiated the alert. We look for “not satisfied” in a trace message. The alert will be created if an item appears three times.
In future work, we can use application insights to:
- monitor the number of requests that are made to our bot
- monitor the number of errors that are made by our bot (ex: the user does not enter the correct date format)
- monitor the number of users that are using our bot
- monitor the number of times the user does not finalize the booking process
- etc.
Monitoring the performance of the model in production
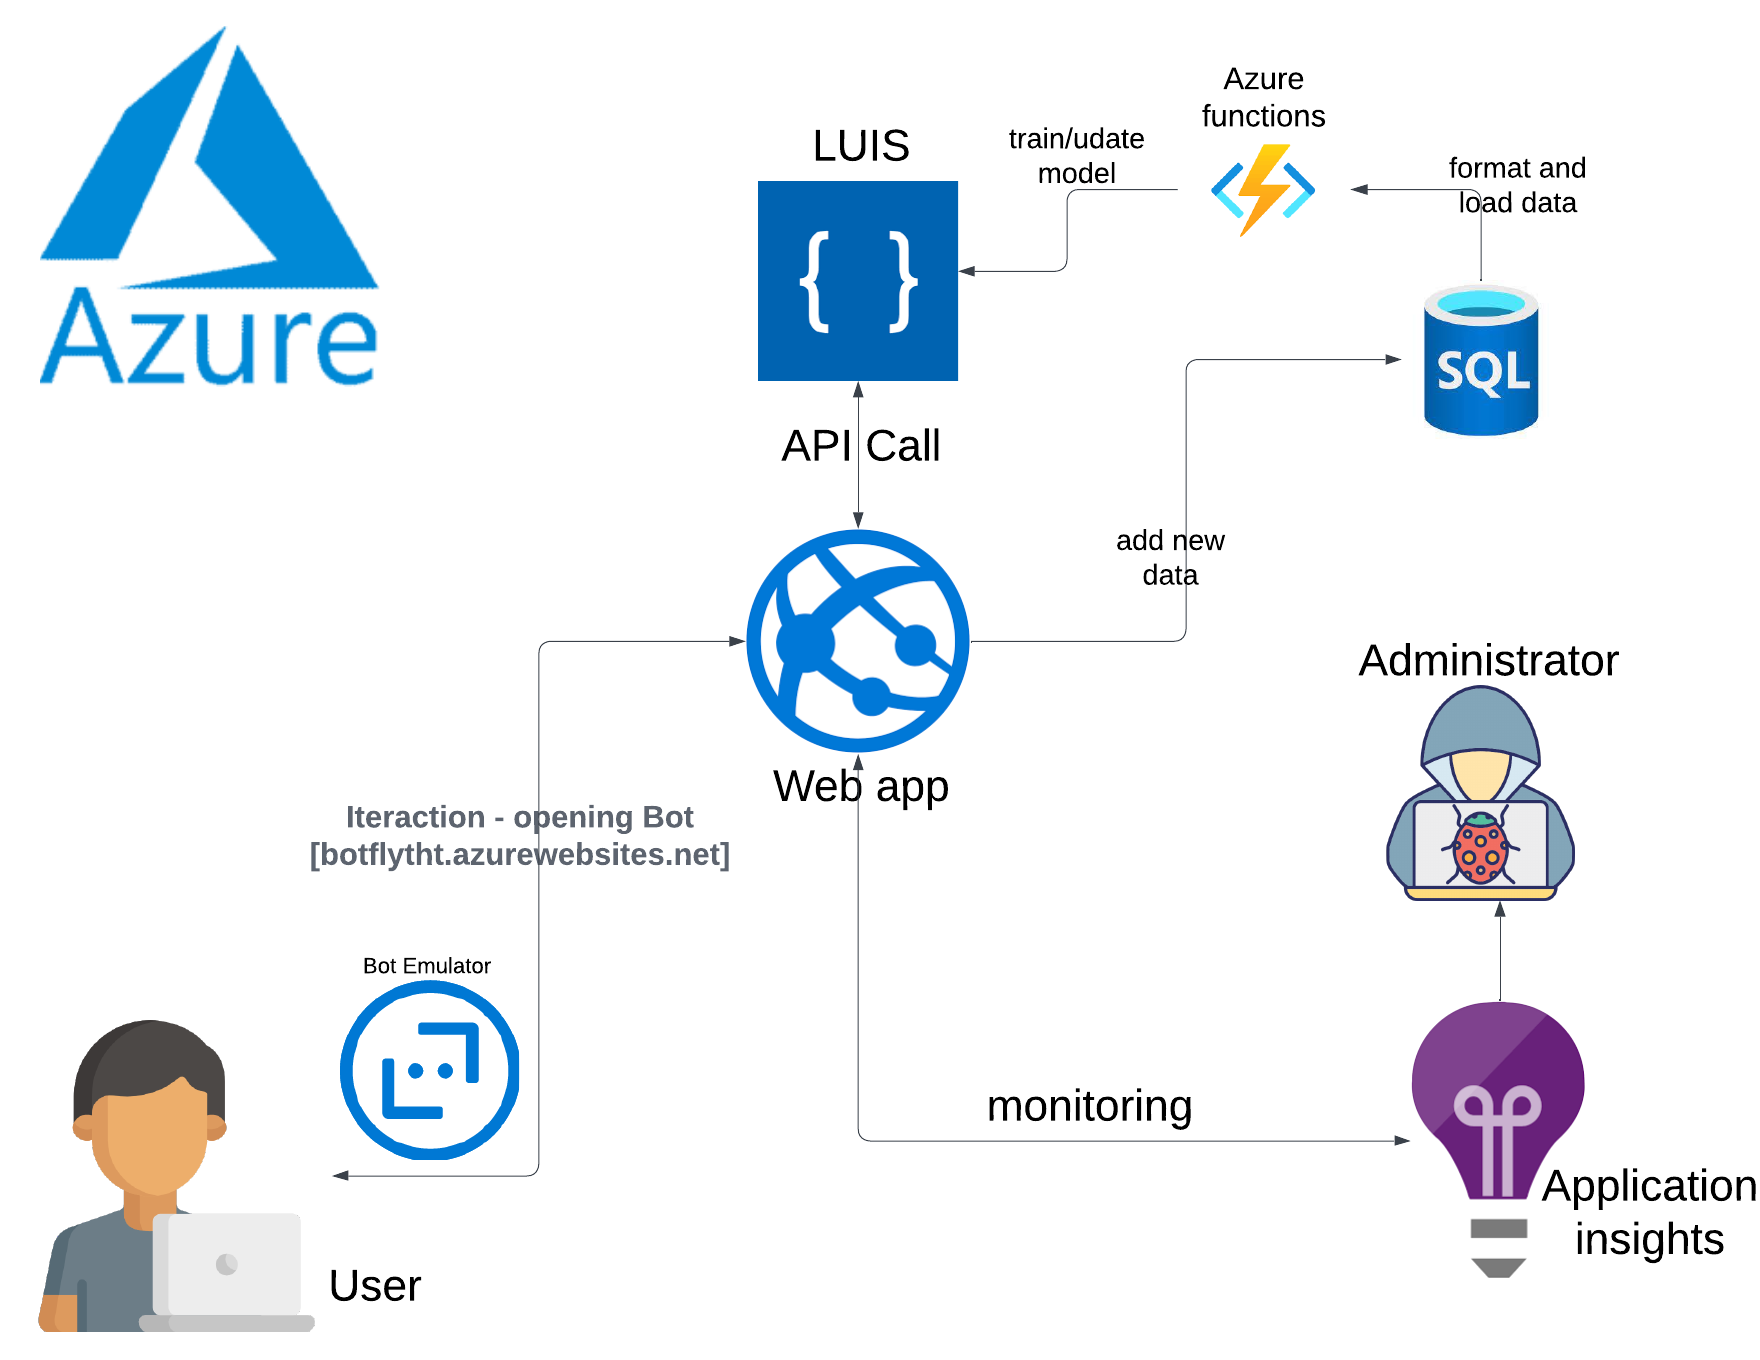
The purpose of this section is to demonstrate the methodology used to monitor the performance of the model in production for this project. Figure 10 depicts the current architecture for MVP, which is the first version of the application. This type of architecture can not monitor the performance of the model in production. The disadvantage is the fact that we can not update our model regarding some new data. It should not be considered definitive. Our future work will focus on developing a target architecture that will enable us to monitor and update our model. As a result, the chatbot will be more efficient.
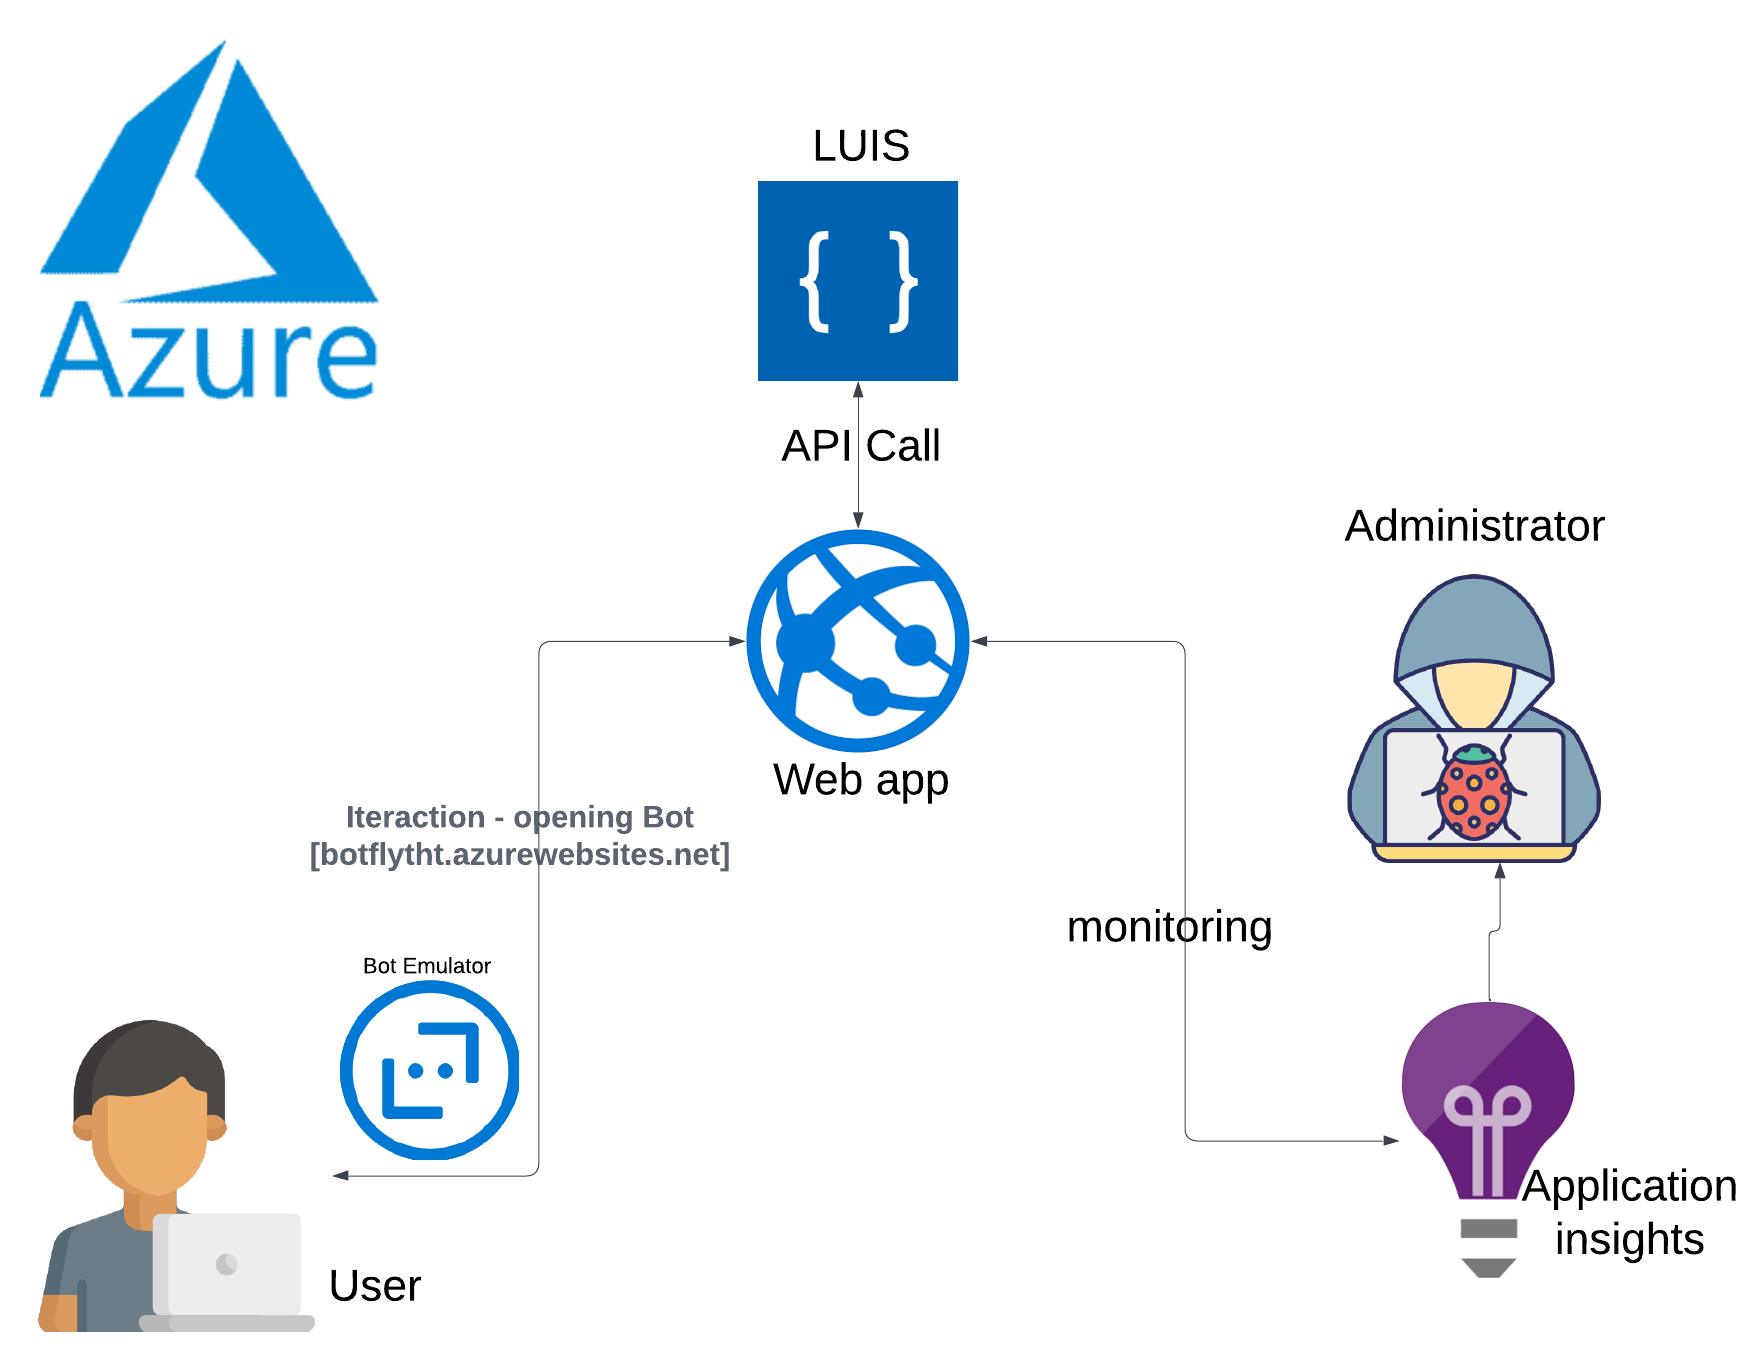
Figure 11 shows the target architecture that improves the methodology for monitoring the model’s performance in production. The future version of the application will incorporate an architecture that allows us to collect the conversations between the bot and the user. We would add them to the data. Having the latest data, already formatted for the LUIS model, we could learn the updated model, using Azure Functions, in a month. If the updated model gives us better performance (regarding the model evaluation) we would update the model using an Azure Function.